

For our Expert Advice section, this week we have with us Diana Poisson from SecondHalfDreams. Today, Diana shares with us a great step by step guide on how to provide your box contents to Amazon.
Amazon has an optional tool that allows you to tell them what’s inside your shipping boxes so they can receive them more efficiently and improve your inventory accuracy.
You’ll find this tool on the “Prepare Shipment” page which is the same page where you review and modify your units, select your carrier, enter your box weight and measurements, calculate your shipping costs and print your shipping labels.
When you get to that page, you’ll review your units and select your carrier. Then you’ll see the “Shipment packing” section:
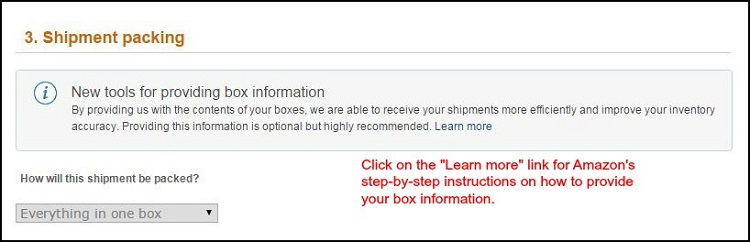
The first step is to tell Amazon how you packed your shipment. The options are “Everything in one box,” “One SKU per box” and “More than one SKU per box.”
The easiest case is when you’re sending in just one box to the warehouse. Because then all you do is select the “Everything in one box” option and move on to calculating your shipping costs and printing your labels.
However, when you’re sending in two or more boxes to the same warehouse, there is some extra work involved. It starts with knowing what’s inside each of your boxes because if you don’t know, you can’t tell Amazon.
Keeping Track of What’s in Your Boxes
The way I track my box contents is to keep a list of what’s going inside as I’m packing them. Otherwise if I don’t keep a list, I won’t remember and then I’ll have to unpack each box to find out. I’ve done that before and besides taking up extra time, it’s not very fun.
I start the tracking by writing the box number on each box. Then as I place an item in the box, I write it down. This log doesn’t have to be too fancy and you don’t have to get too carried away with the details. You just need the name, quantity and expiration date:
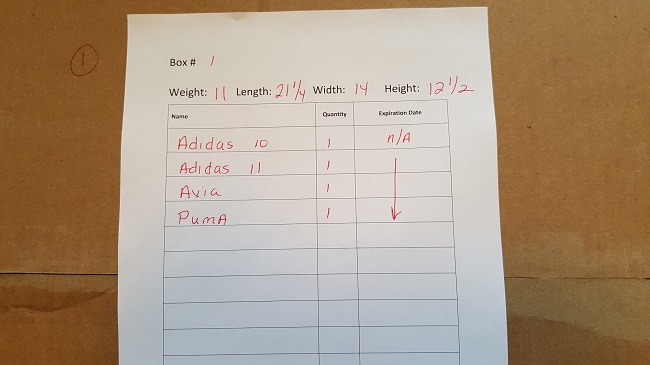
I know that when you fill up your shipping boxes, you should package your items so that everything fits together nicely. But when possible, one tip I have is to place “like” items in the same box as that will make filling out your spreadsheet (shown in a later step) easier.
For example, if you’re sending in shoes, put all of your Adidas sneakers in one box. Likewise, if you’re sending in 5 units of the exact same toy, try fitting all 5 of those in the same box. Again, this isn’t mandatory but it’ll just make the spreadsheet section easier.
The exception to this is when you have the same SKU with different expiration dates. When this happens, you’ll have to pack only one expiration date per SKU inside each box.
For example, say you have five cans of peanuts and two cans expire on August 1 and three cans expire on September 1. You’ll need to put the August cans in one box and the September cans in another box.
Telling Amazon What’s Inside Your Boxes
Now that your boxes are packed, you’ll continue on with the Shipment Packing section. In this example, I’ll go over the “Upload file” method when you have different products in the same box.
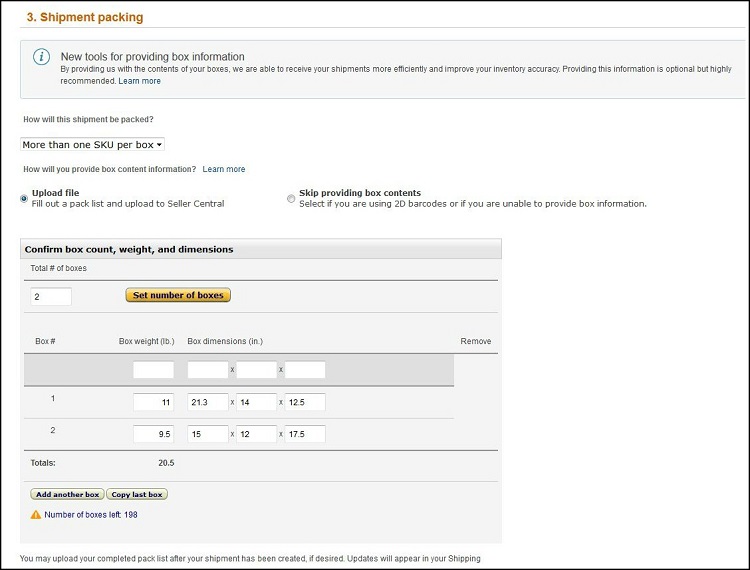
After you entered your box weights and dimensions, it’s time to tell Amazon what’s inside your boxes:

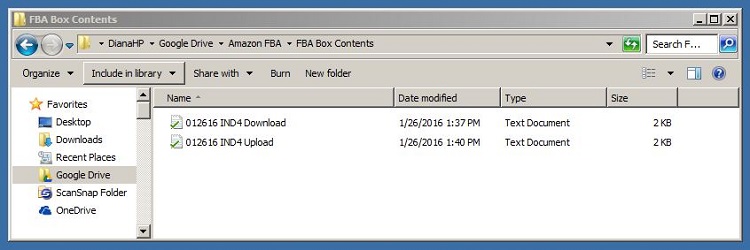
Step 1: Download pack list template: Press the button and the file will download to your computer. Keep a note where it gets saved as you’ll need to open it. For some of you, it may get automatically saved to your “Downloads” folder, but I like to save mine to the “FBA Box Contents” folder that I created on my Google Drive. Also I rename the file to indicate the date, warehouse code and I put “Download” on the end. This way I don’t accidentally upload it back to Amazon.
Step 2: Fill out packing template: This is where you’ll be entering the SKU quantities and expiration dates. There are a few steps to this and before getting started, I recommend reading the step-by-step directions provided by Amazon. You can find that information by clicking here: Seller Central Help: Provide box content information.
Once you’re ready to tackle this, you start by opening the “download” file. It’s a text document that’s hard to read:
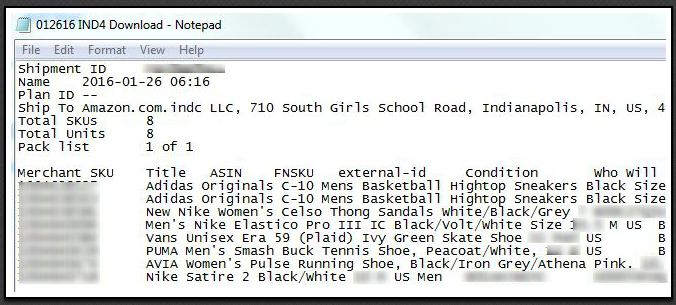
You won’t be entering your item quantity and expiration dates in the text file. Instead, you’ll do that in a spreadsheet so you’ll need to copy everything from the text file to either Excel, Google Sheets or another spreadsheet software program.
In this example, I’ll be using Excel. So, I start by opening the text file and selecting the entire contents (Control-A) and copying it (Control-C) to my clipboard. Then I open a new Excel spreadsheet and paste (Control-V) the data into it.
Now that the information is copied into Excel, I adjust the column widths to make the spreadsheet easier to read and then look for Columns K and M (highlighted in yellow):
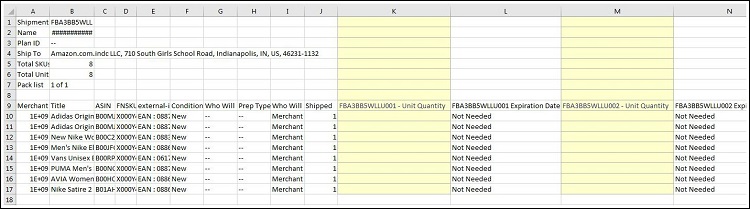
- Column K: This is where you enter the quantity amounts for the first box. Notice that the Shipping ID ends with the three-digit code of 001.
- Column L: This is where you enter any expiration dates for the items in your first box.
- Column M: This is where you enter the quantity amounts for the second box. Notice that the Shipping ID ends with the three-digit code of 002.
- Column N: This is where you enter any expiration dates for the items in your second box.
If you have more than two boxes, then you’ll have more columns to work with. You’ll be able to identify the box number by the three-digit code at the end of the Shipping ID.
At this point, I get my log sheets that I used when filling up my boxes and enter the box quantities and expiration dates (if applicable) for Box #1 (Column K). Remember when I said to group “like” items together in the same box? I do this because it’s quicker for me to fill out the spreadsheet. All I have to do is make sure all the Adidas shoes are in Box #1 and all of the Nike shoes are in Box #2. This way I don’t have to worry about finding any individual shoe styles or sizes.
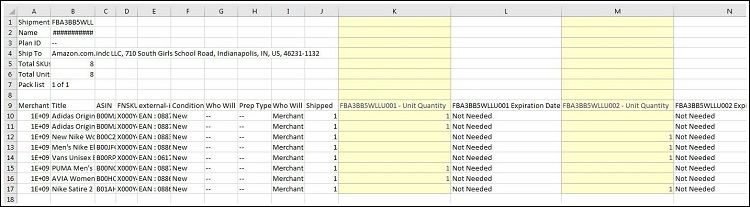
Then I continue with Box #2 (Column M) and the completed spreadsheet looks like this:
Once you’re finished with entering all of your box quantities and expiration dates, then you’ll need to save your file. But rather than saving it as an Excel file, you’ll need to save it as a Text (Tab Delimited) file. If you’re using Google Sheets, you’ll save it as a Tab-separated values (.tsv) file.
When I’m saving my file, I like to name it as the date, warehouse code and Upload. So for this spreadsheet, I named it “012616 IND4 Upload.” This makes it easy to find the correct file that needs to be uploaded to Amazon.
Step 3: Upload your completed pack list: Go back to the “Shipment packing” section and find your file and press the “Upload file” button.
Step 4: Review: Once the file is uploaded, Amazon will check it for errors. This may take a few minutes and you can press the “Click to refresh status” button to keep an eye on the progress. I’m guessing they’re checking to make sure that the correct columns are filled out and the total unit quantities that you entered match the total amount that’s in the box.
If Amazon finds errors with your packing list, then you’ll need to make changes and upload the file again.
If your report comes back error-free, then you’re done with providing your box contents and you can continue on to the next step of calculating your shipping charges.
By Diana Poisson
To find more about Diana you can visit her website – www.secondhalfdreams.com, or her Facebook page – https://www.facebook.com/secondhalfdreams/.
Disclaimer: The information and views presented in this blog post are the opinions of the guest author, and not necessarily those of 888 Lots.